
⚠️ NS Boards Setup Guide Part 3 -- The following guide is part 3 in a series of 14
For first time setup, please ensure to follow the guides in order.
Part 3: Products and Product Lists
The Products area is where you create and manage every food, drink or retail item shown on your boards. Products are kept in Product Lists, which work like categories (for example, pizzas, extras and beverages).
Open Board Manager > Products. This area has three sections: All products, Bundles and Product lists.
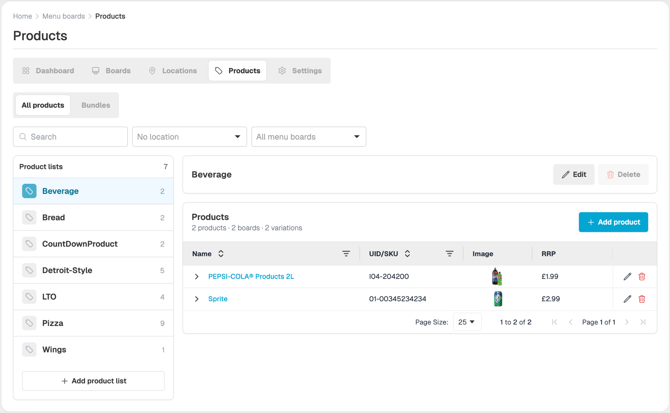
3.1 Create a Product List
- Click Products > All products.
- In the left-hand sidebar, click + Add product list.
- Type a Name for the category, for example Pizzas.
- (Optional) Enter an Integration UID. This is only needed if an outside POS system sends information for this whole category.
- Click Create.
What you will see: The new list appears in the sidebar.
Note: You can leave the integration UID blank. The list is created without any error.
You can change a list’s name or integration UID at any time.
3.2 Add a product
- In the left sidebar, click the Product List that the product belongs to.
- Click + Add product in the top-right corner.
- If you use more than one language, click the language tab you want to fill in first, for example English UK. Each language tab keeps its own text.
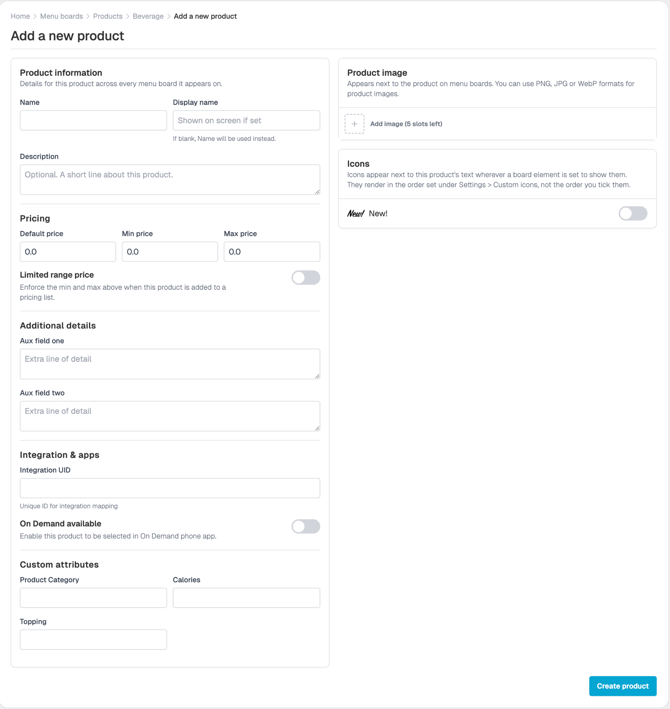
- Fill in the product details. See the table below.
- Add images (up to 5) and turn on any icons.
- Click Create product.
What you will see: The product appears in the list with its name, code, image and price.
|
Field |
What to enter |
|---|---|
|
Name |
The internal name you use to find the product in the CMS. Customers do not see it. |
|
Display name |
The name customers see on the board. If you leave it blank, the Name is used instead. |
|
Description |
A description of the product or your marketing copy. |
|
Pricing |
The standard price. You can also set a Min price and Max price to keep prices within limits across locations. The minimum cannot be higher than the maximum. If it is, an error is shown and the product is not saved. The two can be the same. |
|
Aux text one and Aux text two |
Extra lines of text, such as calories (for example “1400 cal”). |
|
Custom attributes |
Any extra fields you created in Settings, such as Allergens (for example “Milk, Nuts”). |
|
Integration UID |
The product code (SKU) used to match this product to your POS or an automatic data feed. Leave blank if you do not use one. |
-
Product images
You can upload up to 5 images per product, in PNG, JPG or WebP format. Use them for different views of the same item, for example, Image 1 for the side view and Image 2 for the top view. Different zones on your boards can then choose which image to show.
When you reach 5 images, the counter shows 0 and the Add image control disappears.
-
Product icons
Turn icons on or off for each product, for example New! or Chef’s Special. Only icons that you added in Settings (Guide 1) are available.
ℹ️ Note: After you click Create product, two extra tabs become available when you edit the product: Price triggers and Bundles. They are not shown while you are first creating the product.
3.3 Edit a product
- Find the product in its list and click the pencil (edit) icon on its row.
- The edit page has three tabs: Product Information, Price triggers and Bundles. Make your changes on Product Information.
- Click save to keep your changes.
Important: Products created in a product list cannot be moved. The product needs to be deleted and re-created in a different product list.
Tip: The Bundles tab shows every bundle that includes this product.
3.4 Automatic price changes (Price Triggers)
A price trigger changes a product’s price automatically on certain days and at certain times, for example a happy hour or a weekend offer.
- Click the pencil (edit) icon on the product.
- Click the Price triggers tab.
- Click Add new.
- Choose the Days of week the trigger applies to, for example Sat and Sun.
- Set the time range with From and To.
- Enter the Price that applies during that time.
- Click Create.
What you will see: The trigger appears in the list showing its days, start and end times, and price.
- Outside the times you set, the product uses its normal (default) price.
- If two triggers overlap, the one that was created first is used. To avoid confusion, do not set overlapping triggers for the same product.
- Screens pick up a new price within about 5 minutes of saving.
3.5 Find a product.
Use the bar at the top of the Products area.
- Filter by Location: show only the products used at a store.
- Filter by Board: show only the products used on a board.
- Search: type a product name or SKU. The search covers all of your product lists. If nothing matches, the table is empty.
ℹ️ Once you have completed this guide, move onto the next guide linked below:
🔗 Part 4: Bundles
🆘 Require further help and assistance:
Contact the NowSignage Customer Success team to discuss a bespoke training session.
Please note: bespoke training sessions are chargeable.