
⚠️ NS Boards Setup Guide Part 4 -- The following guide is guide 4 in a series of 14
For first time setup, please ensure to follow the guides in order.
Part 4: Bundles
A bundle packages several products together as a meal deal, combo or retail set. The products stay in their own Product Lists. The bundle simply groups them so they can be shown together.
Before you start: make sure every product you want in the bundle already exists in a Product List (Part 3). For a Meal Deal, for example, you would first create the pizza, the side and the drink.
4.1 Create a bundle
- Click Products > Bundles.
- Click + New bundle.
- Click the language tab you want to fill in, for example English UK. If you use several languages, complete each tab.
- Fill in the bundle details:
- Name: the bundle’s internal title, for example Meal Deal.
- Display name: the name customers see on screen.
- Description: what is included, for example Pizza + Extra + Drink.
- Owner: Assign the product that owns this combo. This effectively allows the user to show the product only or the bundle this product owns.
- Integration UID: a reference code that matches an outside system, for example MD-001. Optional.
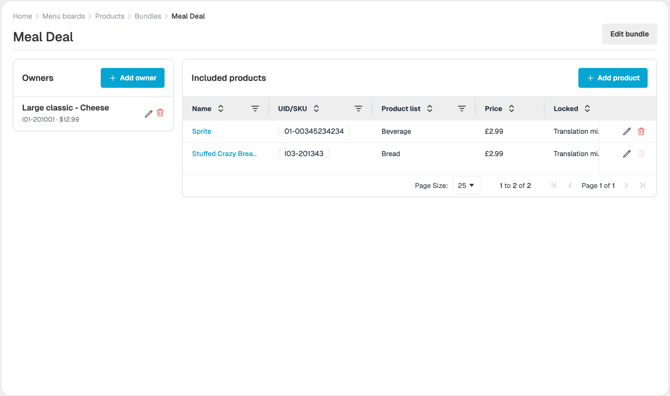
ℹ️ What you will see: The bundle opens so that you can add products to it.
4.2 Add products to a bundle
- Inside the bundle, click Add product.
- From the Product List / Category drop-down, choose the list, for example Pizzas.
- Choose the Product, for example Classic Cheese.
- Decide whether to lock the product (see below).
- Click Add product. Repeat for every product in the bundle.
What you will see: A confirmation appears and the product is added as a new row in the bundle.
|
Setting |
When to use it |
What it means |
|---|---|---|
|
Locked (tick the box) |
For the main items that must always be in the deal. |
The product cannot be deleted from the bundle unless you unlock it first. |
|
Unlocked (leave the box empty) |
For optional or interchangeable items, such as a choice of drink or side. |
The product can be removed at any time. |
Note: You can also add a product to a bundle from the product’s own Bundles tab. The Add to bundle button is greyed out until at least one bundle exists.
4.3 Change or remove bundle items
- To unlock a product: click the pencil (edit) icon on the product’s row in the bundle, remove the tick from Locked, then click Update.
- To remove a product: click the trash (delete) icon on its row. Locked products have no trash icon, so unlock them first.
- To delete a whole bundle: remove or unlock and remove every product in it, go back to the Bundles list, then click the delete icon on the bundle’s row and confirm.
Important: A bundle that still contains products cannot be deleted. A warning appears and the bundle stays in place. Empty the bundle first.
ℹ️ Once you have completed the guide, move onto the next guide linked below:
🔗 Part 5: Boards and Folders.
🆘 Require further help and assistance:
Contact the NowSignage Customer Success team to discuss a bespoke training session.
Please note: bespoke training sessions are chargeable.