
⚠️ NS Boards Setup Guide Part 5 -- The following guide is guide 5 in a series of 14
For first time setup, please ensure to follow the guides in order.
Part 5: Boards and Folders
The Boards area is where you create, organise and open your menu boards. Open Board Manager > Boards. It has two sub-tabs:
- All boards: every board you have created and your folders.
- Zone Library: reusable zone designs (see Part 8).
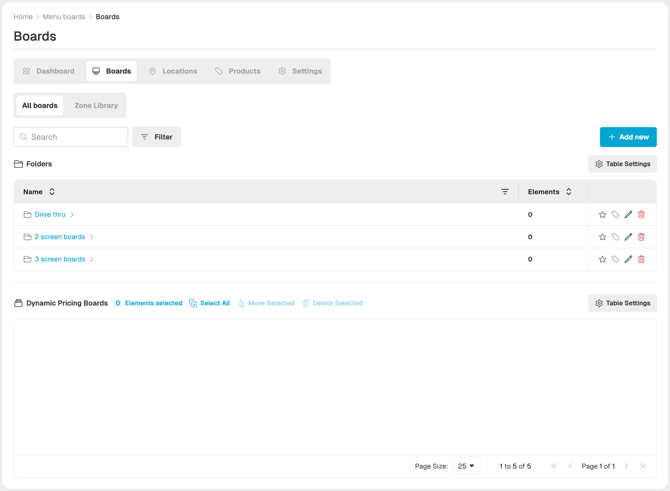
Note: If you have no boards yet, the table is replaced by a message and a Create New button.
5.1 Organise boards with folders.
Folders let you group boards, for example by region, state, store type or country.
- Click + Add new in the top-right corner.
- Click Add folder.
- Enter a Name, for example Scotland or England.
- (Optional) To create a sub-folder, choose a Parent folder.
- Click Create folder.
Tip: Keep folders to a maximum of 2 levels deep. Many nested folders make boards hard to find and manage.
5.2 Create a board
- Click + Add new > Add board.
- Fill in the board details. See the table below.
- Click Create.
What you will see: The Board Designer opens (see Part 6) so you can start designing straight away.
|
Field |
What to enter |
|---|---|
|
Name |
A clear name, for example EnglandBoard-001. The name is required. |
|
Create from template |
Choose a blank canvas, or choose an existing board to copy its layout. Copying a board brings across all of its variations and their zone designs. |
|
Locale |
The board’s language, for example English UK or English US. |
|
Folder |
The folder to store the board in. If you leave this blank, the board is placed at the top level. |
|
Access tags |
Limits who can view and edit the board to the user groups you choose. See Part 11. |
5.3 Move a board to another folder.
Move one board
- Find the board in the list and click the pencil (edit) icon on the right of its row.
- In the pop-up window, choose a new folder from the Folder drop-down.
- Click Update.
Move several boards at once
- Tick the boxes next to the boards you want to move.
- Click Move Selected.
- Choose the destination folder.
- Confirm.
ℹ️ What you will see: The boards appear in the new folder and are no longer in the old one.
5.4 Find a board
- Search: use the search bar at the top left to find a board by name. You can use wildcard searches.
- Filter by access tag: show only boards that carry a particular access tag.
- Choose columns: click Table Settings to show or hide columns. Click Reset table to go back to the default.
- Sort: click a column heading (where an arrow is shown) to sort alphabetically or numerically.
ℹ️ Once you have completed the guide, move onto the next guide linked below:
🔗 Part 6: The Board Designer.
🆘 Require further help and assistance:
Contact the NowSignage Customer Success team to discuss a bespoke training session.
Please note: bespoke training sessions are chargeable.