
⚠️ NS Boards Setup Guide Part 6 -- The following guide is guide 6 in a series of 14
For first time setup, please ensure to follow the guides in order.
Part 6: The Board Designer
The Board Designer is the visual workspace where you set up a board’s size and background and add zones to it. To open it, create a new board or click an existing board in the All boards list.
6.1 The three panels
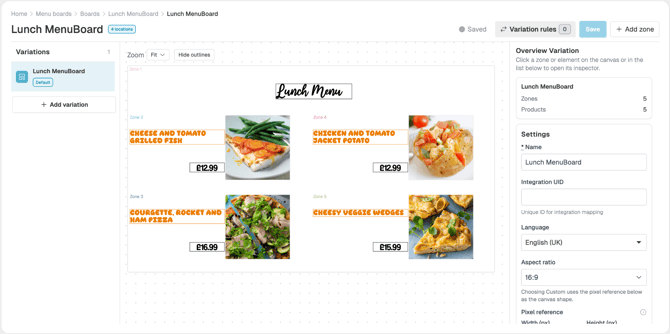
|
Panel |
What it does |
|---|---|
|
Left: Variations |
Lists the default board and any variations you have created for different stores or menu times. |
|
Center: Canvas |
The workspace where you build, position and preview zones. |
|
Right: Inspector |
Shows the settings for whatever is selected: the board, a zone, an item or an element. It changes as you select different things. |
Tip: Limit each board to 20 variations at most. If a site needs more, create a separate board. This keeps the system running smoothly.
6.2 Board settings and size
- Select the board in the Inspector panel so that the Settings card is showing.
- Make your changes (see the table below).
- Click Save settings at the bottom of the card.
Important: Click Save settings after any change to the size or background. If you do not, the canvas stays as it was and your change is lost when you reload the page.
|
Setting |
What it does |
|---|---|
|
Board name and Integration UID |
Rename the board, or set a code that matches it to an outside data feed. |
|
Langauge |
Changes the board’s display language. |
|
Aspect ratio |
Choose 16:9 (the default), 9:16, 4:3 or Square, or choose Custom. |
|
Custom pixel size |
Type an exact width and height. For example, 1920 × 1080 for a standard HD screen, or 3840 × 1080 for two screens side by side. |
6.3 Set the background.
The background sits underneath all of your zones. It can be a colour, a picture or a looping video.
-
A solid colour
-
In the Background card, choose a colour with the Background colour picker.
-
Click Save settings.
-
-
A picture
-
In the Background card, click Choose file.
-
Select an image from your media library.
-
Click Save settings.
-
-
A video
-
First make sure the video has been uploaded to the main CMS content area and has finished processing. A video that is still processing cannot be chosen.
-
Back in the Board Designer, click Set video – choose a video.
-
Select the video from the Content Library.
-
Click Save settings.
-
To check it, click Play background video at the top of the canvas.
-
6.4 Lock or unlock a board
Lock a board to stop accidental or unauthorised changes.
- Scroll to the bottom of the Inspector panel.
- Click Lock board.
What you will see: While the board is locked, you cannot edit zones, add variations or change properties.
To make changes again, click Unlock board in the Inspector.
6.5 Save your work
When you have unsaved changes, a yellow dot labelled 'Unguarded changes' appears at the top right. Click Save and the dot changes the colour to grey and the Saved label is displayed.
Important: If you try to leave the page with unsaved changes, you will be asked to confirm. If you confirm, your unsaved changes are discarded.
ℹ️ Once you have completed the guide, move onto the next guide linked below:
🔗 Part 7: Working with Zones.
🆘 Require further help and assistance:
Contact the NowSignage Customer Success team to discuss a bespoke training session.
Please note: bespoke training sessions are chargeable.