
To configure SSO in your NowSignage account, you'll need to set up authentication in two separate locations:
Part 1: Azure AD Configuration – First, you'll create and configure an application in your Azure AD account. This tells Azure how to authenticate users logging into NowSignage.
Part 2: NowSignage CMS Configuration – Then, you'll enter the authentication details from Azure into your NowSignage account settings. This enables NowSignage to recognize and accept Azure logins.
Part 1: Azure AD Configuration:
Step 1: Enter Azure AD and click into 'Enterprise Applications'.
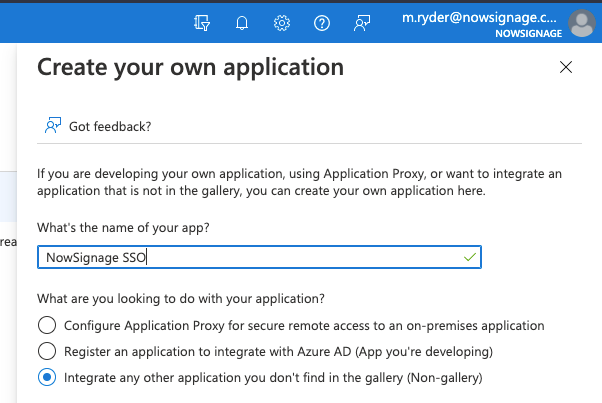
Step 2: Create a new application with the top bar → “+ New application” → “Create your own application”:

Step 3: Create the app as a “Non Gallery” app and enter in a name (e.g. NowSignage SSO):
Step 4: Click on “Single sign-on” on the left sidebar:

Step 5: Select 'SAML' as the single sign-on method:

Step 6: Click 'edit' on the Basic SAML Configuration section (1) and enter in the following details:
- On "Identifier (Entity ID)" →
https://secure.nowsignage.com/saml/metadataand make default - On "Reply URL (Assertion Consumer Service URL)" →
https://secure.nowsignage.com/customers/saml/authand make default - Click 'Save' once you have filled in those two sections.
Step 7: Update the User Identifier In the Attributes & Claims section (2), you need to change how Azure identifies users to NowSignage:
- Find the field labeled 'Unique User Identifier (Name ID)'
- Replace the current value
user.principalnamewithuser.mail
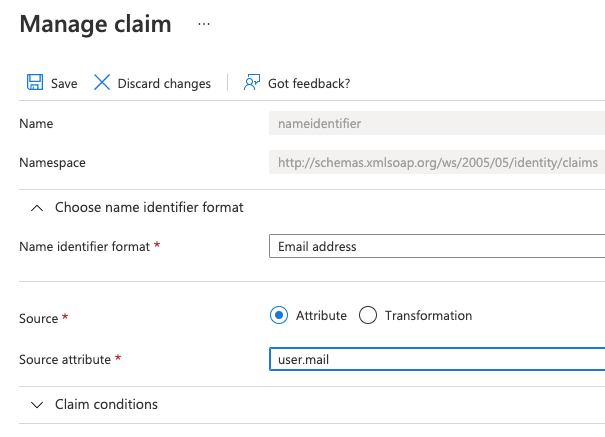
- Click 'Save' once the change has been made.
Step 8: Retrieve Your Azure SSO Details Once you save your SAML settings, Azure will automatically generate the authentication URLs and security certificate needed to connect NowSignage to Azure AD. Make note of the following information, you'll need these values when configuring NowSignage in Part 2:
- The login URL
- The Azure AD identifier (also called 'Microsoft Entra Identifier')
- The certificate (in Base64 format) - Click 'Download' on this

Step 9: Add Users to the NowSignage SSO App in Azure Users must be added to the NowSignage SSO application in Azure if you want them to be able to log in via SSO in NowSignage.
- Within Azure, in your NowSignage SSO app, select "Users and groups" from the left menu
- Click "Add user/group"
- Search for and select the user(s) you want to add
- Click "Assign" to confirm

Important: Users must already be invited to your NowSignage account before they can log in via SSO. This step simply tells Azure which users are allowed to authenticate through this app.
Part 2: NowSignage CMS Configuration:
Step 1: Access NowSignage SSO Settings
- Log into your NowSignage account
- Click your initials in the top right corner
- Select "My Account"
- Click "Users and Roles" in the top menu bar
- Select "SSO Configuration"

Step 2: Enable SSO and Enter Azure Details
- Check the box labeled "Use SSO for customer login"
- Copy the following information from your Azure AD portal and paste them into the corresponding fields:
- Identity Provider ID – Find this in Azure under 'Microsoft Entra Identifier' (from Step 8 above)
- Certificate – In Azure, locate the "Certificate (Base64)" section in your SSO settings. Click to download or view the certificate file. Copy the entire text content, including the
-----BEGIN CERTIFICATE-----and-----END CERTIFICATE-----lines. In NowSignage, paste this text into the "New Identity Provider Certificate" field. - Authentication Context – Enter:
urn:oasis:names:tc:SAML:2.0:ac:classes:Password - (Optional) Force Authn – Check this box if your organization uses Multi-Factor Authentication (MFA). This ensures users must authenticate through Azure MFA before logging into NowSignage

Step 4: (Optional) Exclude Users from SSO If you want specific users to still log in with their NowSignage password instead of SSO:
- On the SSO Configuration page, scroll to the bottom to find the "User Exception List"
- Search for and select the users you want to exclude
- Click to add them to the exception list
Recommendation: Exclude at least one Account Owner. If your identity provider goes down, they can log in and disable SSO temporarily.

User Management Configuration (Optional):
By default, new users must be manually invited to your NowSignage account before they can log in via SSO. If you want to automate this process, you can enable automatic user creation.
Without Automatic User Creation (Default):
- Users must be invited to NowSignage first
- They then log in via SSO
- If a user tries to log in via SSO without being invited first, they will be denied access
With Automatic User Creation (Optional):
- Users don't need to be pre-invited
- When they log in via SSO for the first time, NowSignage automatically creates their account
- You can assign them a default role and project access
To Enable Automatic User Creation:
- Check the box for 'Create new users'
- Select a 'Role for new users' from the dropdown (only custom roles appear here)
- Select which 'Projects' new users should have access to, then click 'save'.
Critical Step: Configure IDP Attributes Mapping This step is mandatory for automatic user creation to work. You must map Azure fields to NowSignage fields.
In the "IDP Attributes Mapping" section, you'll see a table with three columns:
- IDP KEY – The Azure field name
- NOWSIGNAGE KEY – Must be exactly "email" or "name" (these are required)
- FOR ACCESS TAGS – Optional
You need TWO mappings:
- Email Mapping:
- NOWSIGNAGE KEY:
email(must be lowercase, no spaces)
- NOWSIGNAGE KEY:
- Name Mapping:
- NOWSIGNAGE KEY:
name(must be lowercase, no spaces)
- NOWSIGNAGE KEY:
Where to Find the IDP KEY Values in Azure:
- Go back to your NowSignage app in Azure AD
- Select "Single Sign On" from the left menu
- Scroll to "User Attributes & Claims" section
- You'll see a list of claims. Look for the ones labeled:
- Email (usually:
http://schemas.xmlsoap.org/ws/2005/05/identity/claims/emailaddress) - Name (usually:
http://schemas.xmlsoap.org/ws/2005/05/identity/claims/displayname)
- Email (usually:
- Copy the exact IDP KEY value from your Azure account and paste it into the NowSignage mapping table
- Click 'Update mappings' to finalise the changes.
Important Note: These field names are standard across most Azure AD accounts, but your organisation may have customised them. Always copy the exact value from YOUR Azure account, don't assume it matches another account's setup.
Warning: If you don't map these fields correctly, automatic user creation will fail. The NowSignage keys MUST be exactly "email" and "name" if they're different, the integration won't work.

Optional: Update Users on Every Login If you enable the "Update users" checkbox, NowSignage will check and update each user's role, project access, and access tags every time they log in. This is useful if you change settings and want those changes applied immediately to existing users.
Manual Role and Project Updates You can also manually update any user's role or project access at any time through the NowSignage admin dashboard, you don't need to wait for them to log in.
First Login Flow After you add users to the NowSignage SSO app in Azure and set up the automated user creation, they must complete their first login through the Azure portal:
- User goes to https://myapplications.microsoft.com/
- User finds and clicks the NowSignage application
- User is redirected to NowSignage and their account is automatically created
- Their role and project access are assigned based on your settings within NowSignage
Future Logins After the first login, users can log in directly to NowSignage without using the Azure portal:
- User goes to https://secure.nowsignage.com/customers/sso_login
- User is redirected to Azure to authenticate
- User is automatically logged into NowSignage
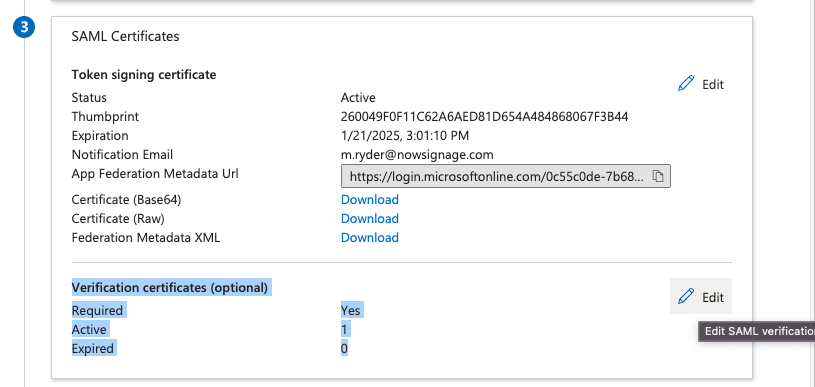
Verification Certificate (Optional):
It is possible to enable a verification certificate within the NowSignage SSO app, to do this within Azure, please edit the area shown below:
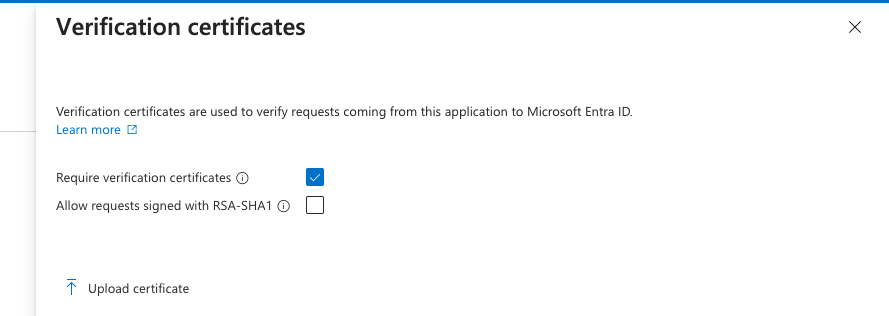
The NowSignage verification certificate for uploading can be downloaded from the link below:
https://drive.google.com/file/d/18LSJ-93aEwhvULVRPe8addwQnLJUn_xC/view?usp=sharing