
The Colour E-Paper EMDX series, Samsung's next-generation product featuring paper-thin, lightweight displays with ultra-low power consumption. It delivers paperlike picture quality without additional infrastructure, digitising the traditional paper experience.
The Samsung 13-inch and 32-inch Colour E-Paper EMDX is now supported on NowSignage. Designed as a digital alternative to printed posters and point-of-sale signage, it combines a paper-like colour display with ultra-low power consumption.
NowSignage Supported Models:
- 13” Colour E-paper EMDX (LH13EMDIBGBXEN)
- 32” Colour E-Paper EMDX (LH32EMDIBGBXEN)
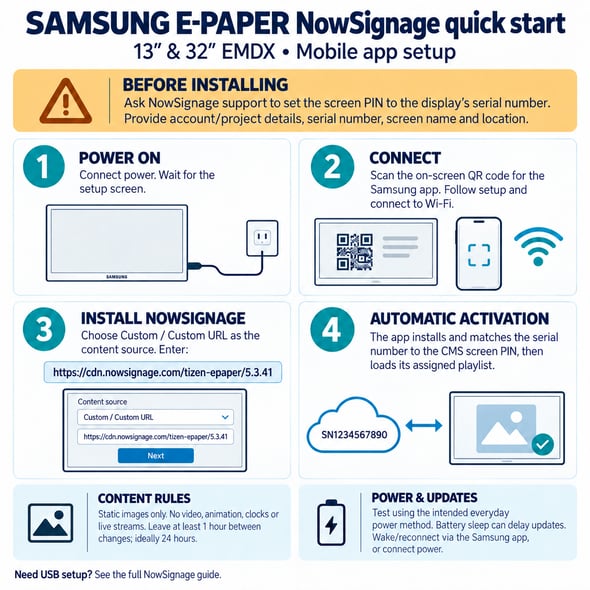
Before you begin the installation, please review the important E-Paper guidance below.
⚠️ Important E-Paper Content Considerations ⚠️
Samsung E-Paper displays have important hardware behaviours due to the way E-Ink technology functions. To help you get the best performance from your device and avoid unnecessary screen refreshes, reduced battery life or potential wear to the display, please follow the guidance below when configuring your device and managing content.
-
Image-Only Content
Content should be limited to static images only.
Any visual change causes the E-Paper display to refresh. Frequent refreshes can:
- Significantly reduce battery life.
- Reduce the overall lifespan of the device.
- Potentially damage E-Ink hardware if the display is refreshed excessively.
-
Unsupported Content
The following types of content are not suitable for E-Paper displays:
- Videos
- Clock widgets
- Live streams
- Animated content
- Other frequently changing or dynamic content
-
Recommended Content Change Frequency
When displaying multiple images, allow a minimum of 1 hour between content changes. to preserve battery life.
For the optimal battery performance, one content change per 24 hours is recommended where possible.
-
Power Mode and Content Updates
When installing the E-Paper display, configure and test it using the same power method that will be used during normal operation.
For example:
- If the display will normally operate on battery, perform the setup and testing while it is running on battery.
- If the display will normally remain connected to power, perform the setup while it is connected to power.
Changing between battery and mains-powered operation can affect the device's sleep and network behaviour.
When operating on battery, the E-Paper display will enter deep sleep after a period of inactivity. While in deep sleep, the device is effectively offline and will not immediately receive content changes from the NowSignage CMS.
If a content change has been made in NowSignage but is not appearing on the display:
- Wake/reconnect the E-Paper display using the Samsung E-Paper app; or
- Connect the display to power.
Once the device is awake and has re-established its network connection, it will check NowSignage and retrieve any updated content.
Important: A content update not appearing immediately does not necessarily mean that the NowSignage application or network configuration has failed. On battery-powered installations, first check whether the E-Paper display has entered deep sleep via the Samsung app.
Installation Steps:
Step 1. Initial E-Paper Device Setup
(Mobile App Method)
Follow these steps to set up the Samsung E-Paper display:
- Connect the power
- Plug the E-Paper display into a power source.
- Wait for the on-screen setup
- Allow the device to start up and display the initial setup instructions.
- Download the Samsung app
- Scan the QR code displayed on the screen to download the Samsung setup app.
- Complete the setup
- Follow the on-screen instructions.
- Connect the E-Paper display to the required Wi-Fi network.
- Manage the device
- Once setup is complete, you will be presented with options to manage the device.
- From the options, select Custom URL (See Step 2)
- Choose Custom URL as the content source and type in the URL https://cdn.nowsignage.com/tizen-epaper/5.3.41
⚠️ Important: PIN Activation
Samsung E-Paper displays do not use the standard PIN entry process used on other NowSignage devices. Because E-Ink technology refreshes the display whenever the image changes, the NowSignage application checks the CMS automatically for a screen whose PIN matches the device's serial number instead.
Therefore, ensure the E-Paper serial number has been configured as the screen PIN in the NowSignage CMS before installation.
Only the NowSignage support team can create custom serial number PINs. If the screens do not yet exist in NowSignage, please raise a support ticket with your account and project details, and include the following information for each screen:
-
Serial Number
- Screen Name
- Screen Location
Step 2. Install the NowSignage App
Once the Samsung E-Paper display has been set up:
- Change the Content source to Custom.
- Enter the following URL in Custom App URL:
https://cdn.nowsignage.com/tizen-epaper/5.3.41 - The NowSignage application will begin to download and install automatically.
- Once installed, the application will check the NowSignage CMS for a screen using the device's E-Paper serial number as its PIN.
- If a matching screen exists in the CMS:
- The application will automatically activate the PIN.
- The device will begin playing the content assigned to that screen's playlist.
-
Alternative Installation Method – USB
Samsung E-Paper displays can also be configured, and the NowSignage application can be installed using a USB device. This method lets you apply the network configuration, Samsung device settings and Custom App URL without completing the initial setup through the Samsung E-Paper mobile app.
Before You Begin
Before starting the USB installation:
- Ensure the corresponding screen has already been created in the correct NowSignage account.
- Have the Wi-Fi SSID and password available.
- Use a USB-C storage device formatted as FAT32.
- Ensure the E-Paper display is at the initial setup screen showing the QR code. If the display has already been configured, factory reset it before using the USB installation method.
1. Generate the USB Configuration
- Open the Samsung E-Paper Configurator:
https://epaper-setup.samsungedo.com/ - Select the appropriate Samsung E-Paper model.
- Enter the network details for the Wi-Fi network (SSID) the display will use.
- Set the Device PIN to a six digit pin, e.g: 000000
- Configure the content source as Custom App.
- Enter the NowSignage Custom App URL:
https://cdn.nowsignage.com/tizen-epaper/5.3.41 - Complete the remaining required configuration options.
- Generate the configuration and download the XML file.
2. Prepare the USB Device
Download the generated file and create a folder named SAMSUNG_E-Paper in the root of the USB device with a subfolder called preset that contains your config.xml.
NOTE, The E-Paper only supports USB C ports. So the USB stick you use must be USB C, Not USB A.
The resulting folder structure should contain:
SAMSUNG_E-Paper(Folder)
→ preset(Folder)
→ config.xml
3. Install the Configuration
- Ensure the Samsung E-Paper display is on the initial QR code/setup screen.
- Insert the USB device into the E-Paper display's USB data port (not the power port).
- The display will automatically detect the USB configuration and begin applying the settings.
- During this process, the display may refresh several times and show messages such as Custom App or Initialising. This is expected while the configuration and application are being applied and may take a few minutes to complete.
- Once the configuration has completed successfully, the display will connect to the configured network and install the NowSignage application.
- NowSignage will then connect to the CMS and load the content assigned to the corresponding screen.
⚠️ Do not remove the USB device or interrupt the device while the configuration is being applied.