
⚠️ NS Boards Setup Guide Part 1 -- The following guide is guide 1 in a series of 14
For first time setup, please ensure to follow the guides in order.
NS Boards is a NowSignage feature that lets you manage products, prices and promotions centrally for digital menu boards and in-store displays. You can use a single design across multiple locations and set what each screen shows based on the location, time of day, stock availability or live data.
CLICK HERE to read more about NS Boards. Or click the play button below:
⚠️ Before proceeding:
Please read the following information before proceeding.
🚩 Feature Flagged 🚩
NS Boards is part of NS Suite, a collection of premium features available on the NowSignage platform.
To discuss enabling NS Boards for your account or project, please contact your NowSignage licence reseller or NowSignage representative.
- Are you a NowSignage licence reseller? - CLICK HERE
- Are you a NowSignage End User - CLICK HERE
ℹ️ NS Boards is available on the following NowSignage platforms:
- Global - (secure.nowsignage)
- Middle East (secure.ap-southeast-1)
⚠️ Minimum application version required: v5.4.1 (released Nov 2026) ⚠️
This guide walks you through every task step by step. The setup is broken down into a series of guides, each covering a topic of the setup process.
It is recommended to follow the guides in order to ensure the correct configuration is achieved.
Key terms
These words are used throughout the guide. Come back to this table whenever you are unsure.
|
Term |
What it means |
|---|---|
|
Board (menu board) |
The complete design shown on a digital screen. A board is made up of one or more zones and can have several variations. |
|
Variation |
An alternative version of a board’s layout. For example, a breakfast version and a lunch version of the same board. Rules decide which variation is shown and when. |
|
Zone |
A rectangular area of a board that shows product information, such as one featured product or a list of pizzas. |
|
Element |
A single item inside a zone, such as a product name, a price or a product image. |
|
Zone Library |
A shared collection of saved zones that you can reuse on many boards. |
|
Product |
An item you sell, such as a pizza or a drink, with its name, price, images and other details. |
|
Product List |
A category that holds products, for example Pizzas, Extras or Beverages. |
|
Bundle |
A meal deal or combo that packages several products together. |
|
Location |
A store or site where your boards are shown. |
|
Screen |
A physical display at a location. |
|
Rule |
An instruction that tells the system when to show a particular variation. For example, “weekdays between 11:00 and 14:00”. |
|
Tag |
A label attached to a board, location or screen. Targeted tags send content to specific places. Access tags control who can see and edit a board. See Part 11. |
|
Master board |
The original version of a board. Individual locations can make their own changes (called overrides) without changing the master. |
|
Integration UID |
A unique code that matches an item in Board Manager to the same item in another system, such as your till (POS) system. If you do not use an automatic data feed, you can leave it blank. |
|
POS |
Point of sale. Your till or ordering system. |
Part 1: Getting Started with Board Manager
This section shows you how to open Board Manager and explains what you see when you get there.
1.1 Open Board Manager
- Sign in to the NowSignage CMS.
- In the left-hand menu, click Board Manager.
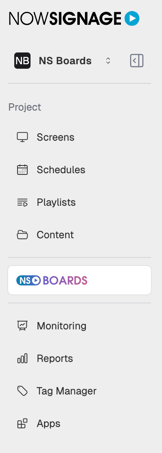
ℹ️ What you will see: Board Manager opens on the Dashboard tab.
⚠️ Note: If you cannot see Board Manager in the menu, the feature has not been switched on for your account. Contact your administrator or NowSignage Support.
1.2 Main Menu Options
Across the top of the board manager, you will see five tabs. Each one is a separate work area.
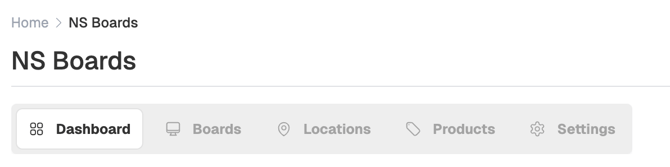
|
Tab |
What you do there |
|---|---|
|
Dashboard |
See a summary of your setup progress, key totals and recent data imports. |
|
Boards |
Create and organise boards, and manage the Zone Library. |
|
Locations |
Add your stores, import them in bulk, assign boards and link screens. |
|
Products |
Manage product lists, products and bundles. |
|
Settings |
Set the defaults that apply to all your boards. |
1.3 The Dashboard
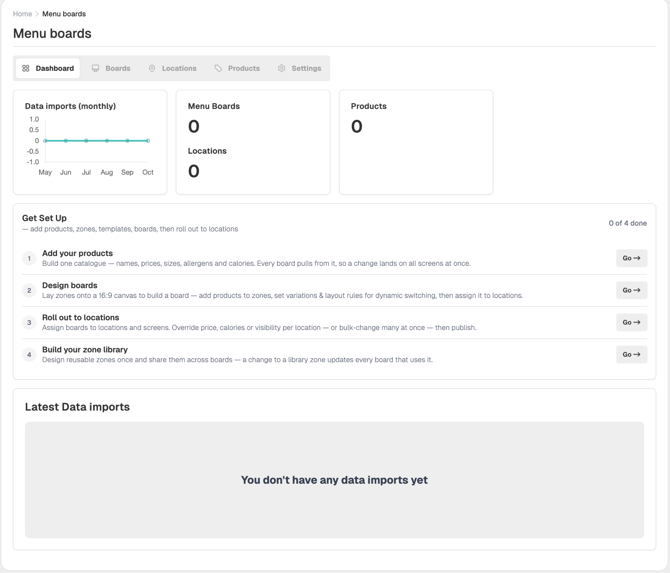
The Dashboard is the first thing you see. It has three parts.
Summary cards
|
Card |
What it shows |
|---|---|
|
Data Imports Monthly |
How many data imports happened each month. |
|
Menu Boards & Locations |
The total number of boards you have created and the total number of locations you have added. |
|
Products |
The total number of products you have added. This grows as you build your product lists. |
Get Set Up checklist
The Get Set Up checklist shows the four things you need for a complete setup. Each item has a progress count and a Go link that takes you straight to the right place.

|
Item |
What to do |
|---|---|
|
Products |
Add the products you want to show. |
|
Boards |
Create and design your menu boards. |
|
Locations |
Add the stores where boards will be shown. |
|
Zones (optional) |
Save reusable zone designs that can be shared within a board or across several boards. |
The progress counts go up each time you complete one of these steps.
Latest Data Imports
This list shows your most recent completed data imports. Imports can be automatic (connected to your POS system) or manual (a CSV file that you upload). If you have not imported anything yet, you will see a message saying there are no data imports.
Tip: If a number on the Dashboard or in a list looks out of date, move to another tab and come back. The numbers refresh when the page reloads.
ℹ️ Once you have completed this guide, move onto the next guide linked below:
🔗 Part 2: Settings.
🆘 Require further help and assistance:
Contact the NowSignage Customer Success team to discuss a bespoke training session.
Please note: bespoke training sessions are chargeable.