

Secure Dashboards: A Comprehensive Guide Overview
The Secure Dashboards feature allows NowSignage to display password-protected web pages on digital signage by taking periodic screenshots through the CMS. The system opens an automated incognito browser and can handle the login process automatically, enabling content from secure dashboards to be displayed without manual intervention.
Important:
Live data is not supported by this feature; the minimum refresh interval is five minutes. We recommend thoroughly testing your Secure Dashboards workflow within the CMS using your intended webpage before deployment, as certain sites may restrict automation or block screenshots from being captured accurately.
Caution:
Given the variety of webpages, not all secure webpages are compatible with the Secure Dashboards app.
The following login pages have been tested and are not currently supported:
- Microsoft PowerBi
- Azure B2C
- Google login pages
- Microsoft login page
Setting Up Secure Dashboards
Step 1: Activate the App
- Log into your NowSignage account.
- Navigate to your project and select the 'Apps' section from the left-hand panel.
- Click on the Secure Dashboards app and install (activate) it.
Please note: If the Secure Dashboards feature is not available in your account, please raise a support ticket request, and the team will enable this.
Step 2: Create a Secure Dashboard
- Click on '+ Add Secure Dashboard' to start a new dashboard.
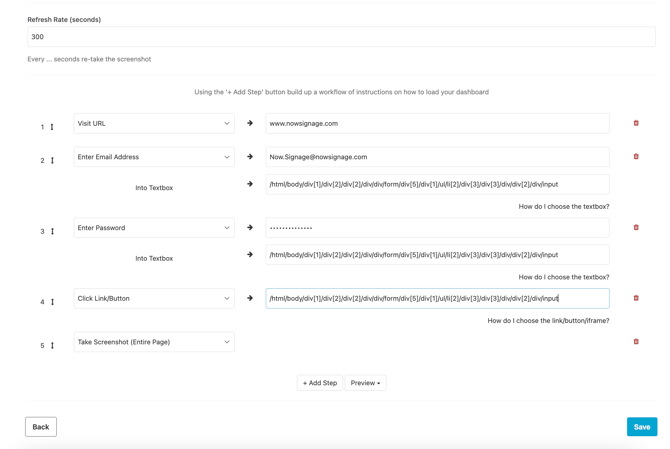
- Select 'New (Blank)' and name your dashboard. You will see the option to set the dashboard as 'Active' make sure this is always ticked. You will also see a refresh rate, please leave this at the default 300 seconds as this is the minimum refresh rate available for the feature currently.
- Choose 'Visit URL' or 'Visit URL with delay' to allow the webpage to load.
- Add further steps such as entering an email/username and password.
- Use the 'Into Textbox' field to specify where data should be entered by copying and pasting from the webpage.
To get this information for your text box/button, please read the following guidance: 'How do i choose the link/button/iframe?':
- Configure the final step to capture a screenshot.
- Click 'Save' to generate a preview. If errors occur, edit the dashboard to correct them.
Generate Preview: Occasionally, the preview might display an error if the added workflow has encountered a failure. If this happens, edit your dashboard to identify and correct the issue.
![]()
Step 3: Add the Dashboard to Your Playlist
- Once satisfied with the preview, add the dashboard to your playlist:
- Create a new playlist or edit an existing one.
- In the 'Add to playlist' area, select 'Secure Dashboards' from the drop-down list.
- Choose the desired dashboard, click 'Add', name it, set the duration, and click 'add to playlist'.
Note - You will see an option for an external URL, please leave this blank as the URL is picked up directly from your Secure Dashboard set up and is not required here.
- The dashboard will update automatically every five minutes.

Important Considerations
- Secure Dashboards operate using an incognito browser that automates the login process and captures a webpage screenshot.
- This feature is not designed for live data, with a minimum refresh period of 5 minutes.
-
The incognito browser is set to UTC time by default, and there is currently no option to alter the timezone.
Troubleshooting/FAQ
- If modifications are made to a secure dashboard, remove the original playlist item and re-add it to reflect updates.
For further assistance or guidance, please raise a support ticket request.
Single Sign-On (SSO) and Multi-Factor Authentication (MFA) is not supported with the Secure Dashboards feature.
This is due to these features being set for security purposes and therefore should not be bypassed.
The NowSignage Secure Dashboards feature uses an automated browser with the following default user agent: Mozilla/5.0 (Windows NT 10.0; Win64; x64; rv:109.0) Gecko/20100101 Firefox/117.0