
Overview
Screen Sync groups can be created individually within the CMS, but where an estate is large, creating groups one at a time can be time-consuming.
The Import via CSV option in the Screen Sync app allows multiple sync groups to be created in a single upload.
This guide covers the requirements for the import, the exact CSV format required, and how to resolve common import errors.
Before You Start
⚠️ There are three requirements that must be met before the import will succeed.
Please confirm all three before building your file.
The import matches screens by PIN, not by screen name, so this list is needed before you begin. PINs can be obtained by exporting your screen data from the CMS — see How to Export Screen Data to a CSV File.
2. You will need the IP address and port of the WebSocket sync server device. This is a required field on the import and cannot be added later. If you are unsure of this, please check with whoever manages your network.
3. Every sync group needs a minimum of two screens — one parent screen and at least one child screen. A row containing a parent screen with no child screen will fail to import.💡 Tip: The screens themselves must already exist in the CMS before you import. The CSV import creates sync groups from existing screens — it does not create new screens.
Step 1 — Export Your Screen Data to Get the PINs
You will need the PIN of every screen that will act as a parent or a child in a sync group.
Export your screen list to CSV by following How to Export Screen Data to a CSV File. This gives you all the PINs in a format you can copy directly into the import template.
Step 2 — Download the Import Template
- Open the Screen Sync app
- Click Add Sync group
- Click Import via CSV
- On the import screen, click to download the blank CSV template
- Open the template in Excel or Google Sheets

The File Format
One sync group per row. All screens belonging to a group sit side by side across a single row. Group names run vertically down column A, one group per row.
|
Column |
Header |
Contents |
|---|---|---|
|
A |
Sync Group Name |
The name you want to give the sync group |
|
B |
Parent WebSocket Server Address |
IP address of the sync server, followed by the port: 8081 |
|
C |
Parent Screen |
PIN of the parent screen |
|
D onwards |
Child Screen 1, 2, 3... |
PIN of each child screen, one per column |
Column A — Sync Group Name
Enter your group names vertically, one per row. Each row becomes one sync group.
Column B — Parent WebSocket Server Address
This is the IP address of the device running the sync server, followed by the port number, in the format IP:port—for example: 192.168.1.225:8081
⚠️ NOTE:
- Samsung Tizen and BrightSign — the sync server runs on the parent screen itself, so use the IP address of the parent screen in that group.
🔗 https://knowledgebase.nowsignage.com/how-to-set-up-screen-sync-for-brightsign-samsung-tizen-devices - Android and Windows — these run a separate sync server, so use the IP address of the device running that server. This is not necessarily one of the screens in the group.
🔗 https://knowledgebase.nowsignage.com/screen-sync-for-android-devices
🔗 https://knowledgebase.nowsignage.com/screen-sync-for-windows-devices
💡 Tip: The port varies by platform. Check the Screen Sync setup guide for your hardware to confirm the correct port before filling this in.
Column C — Parent Screen
Must be the PIN of the parent screen — not the screen name.
Column D onwards — Child Screens
Each child screen goes in its own column, using its PIN. Fill these left to right: Child Screen 1 in column D, Child Screen 2 in column E, and so on.
- To add more child screens than the template provides, add further columns to the right and continue the naming pattern (Child Screen 14, Child Screen 15...). There is no limit to how many screens can be added to a single group.
- At least one child screen is required. Every group must contain a minimum of two screens, so Child Screen 1 in column D cannot be left blank for any row.
- Groups can have different numbers of children. If one group has 2 screens and another has 12, leave the unused child columns blank on the shorter rows — this will not cause the import to fail.
⚠️ Common mistake to avoid: Do not list a group's screens vertically down the sheet, one screen per row. This will create a separate sync group for every screen. All screens belonging to a group must sit across a single row.
Step 3 — Save and Upload
- Save the file as CSV (not .xlsx)
- Return to the import screen in the Screen Sync app
- Upload the file

Step 4 — Check the Results
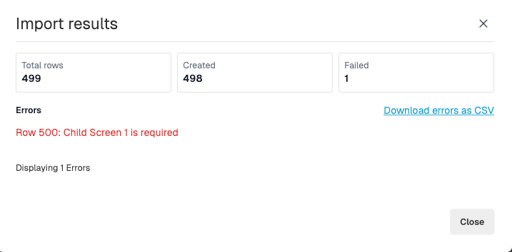
The import processes each row independently, so a single invalid row will not block the rest of the file from importing.
Any rows that fail will be listed with a specific error message, and the full list of errors can be downloaded as a CSV for review.
Most common causes of a row failing:
- Missing Sync Group Name in column A
- A PIN that does not exist in the CMS — usually a typo, or a screen that has not yet been created
- Missing or malformed server address in column B, for example a missing port
- Missing parent PIN in column C
- Fewer than 2 screens on the row, i.e. a parent screen with no child screen
Summary
The Screen Sync CSV import allows multiple sync groups to be created in one upload, rather than building each group individually. Before starting, confirm you have the PIN of every screen involved, the IP address and port of the relevant WebSocket sync server, and that each group will contain at least two screens.
Each sync group must be entered across a single row, with the group name in column A, the server address in column B, the parent screen PIN in column C, and each child screen PIN in its own column from column D onwards. The import will process valid rows even if others fail, and any errors can be downloaded as a CSV for review.
📖 Further Reading: How to Export Screen Data to a CSV File